Introduction
I had been an avid fan of Claude from Anthropic for a long time, but recently found Google’s new model Gemini 2.5 Pro to be quite amazing. This made me want to explore using Gemini 2.0 Flash in one of my projects for its inexpensiveness, so I dug into how to setup Vertex AI on Cloudflare Workers, while also using AI SDK from Vercel. I threw in AI Gateway setup also since I found it helpful for observability and caching responses.
Our Agenda
- Setup Google Cloud and Enable Vertex AI API
- Setup AI SDK for Google Vertex
- Setup Cloudflare AI Gateway for Observability
Setting up Google Cloud Vertex AI
For this article, I’m going to assume you already have a Google Cloud account setup.
Enable Vertex AI API in Google Cloud
First step is to enable Vertex AI API in your Google Cloud project. If you haven’t already done so, click the button to enable it. https://console.cloud.google.com/vertex-ai/dashboard
Create a Service Account in Google Cloud
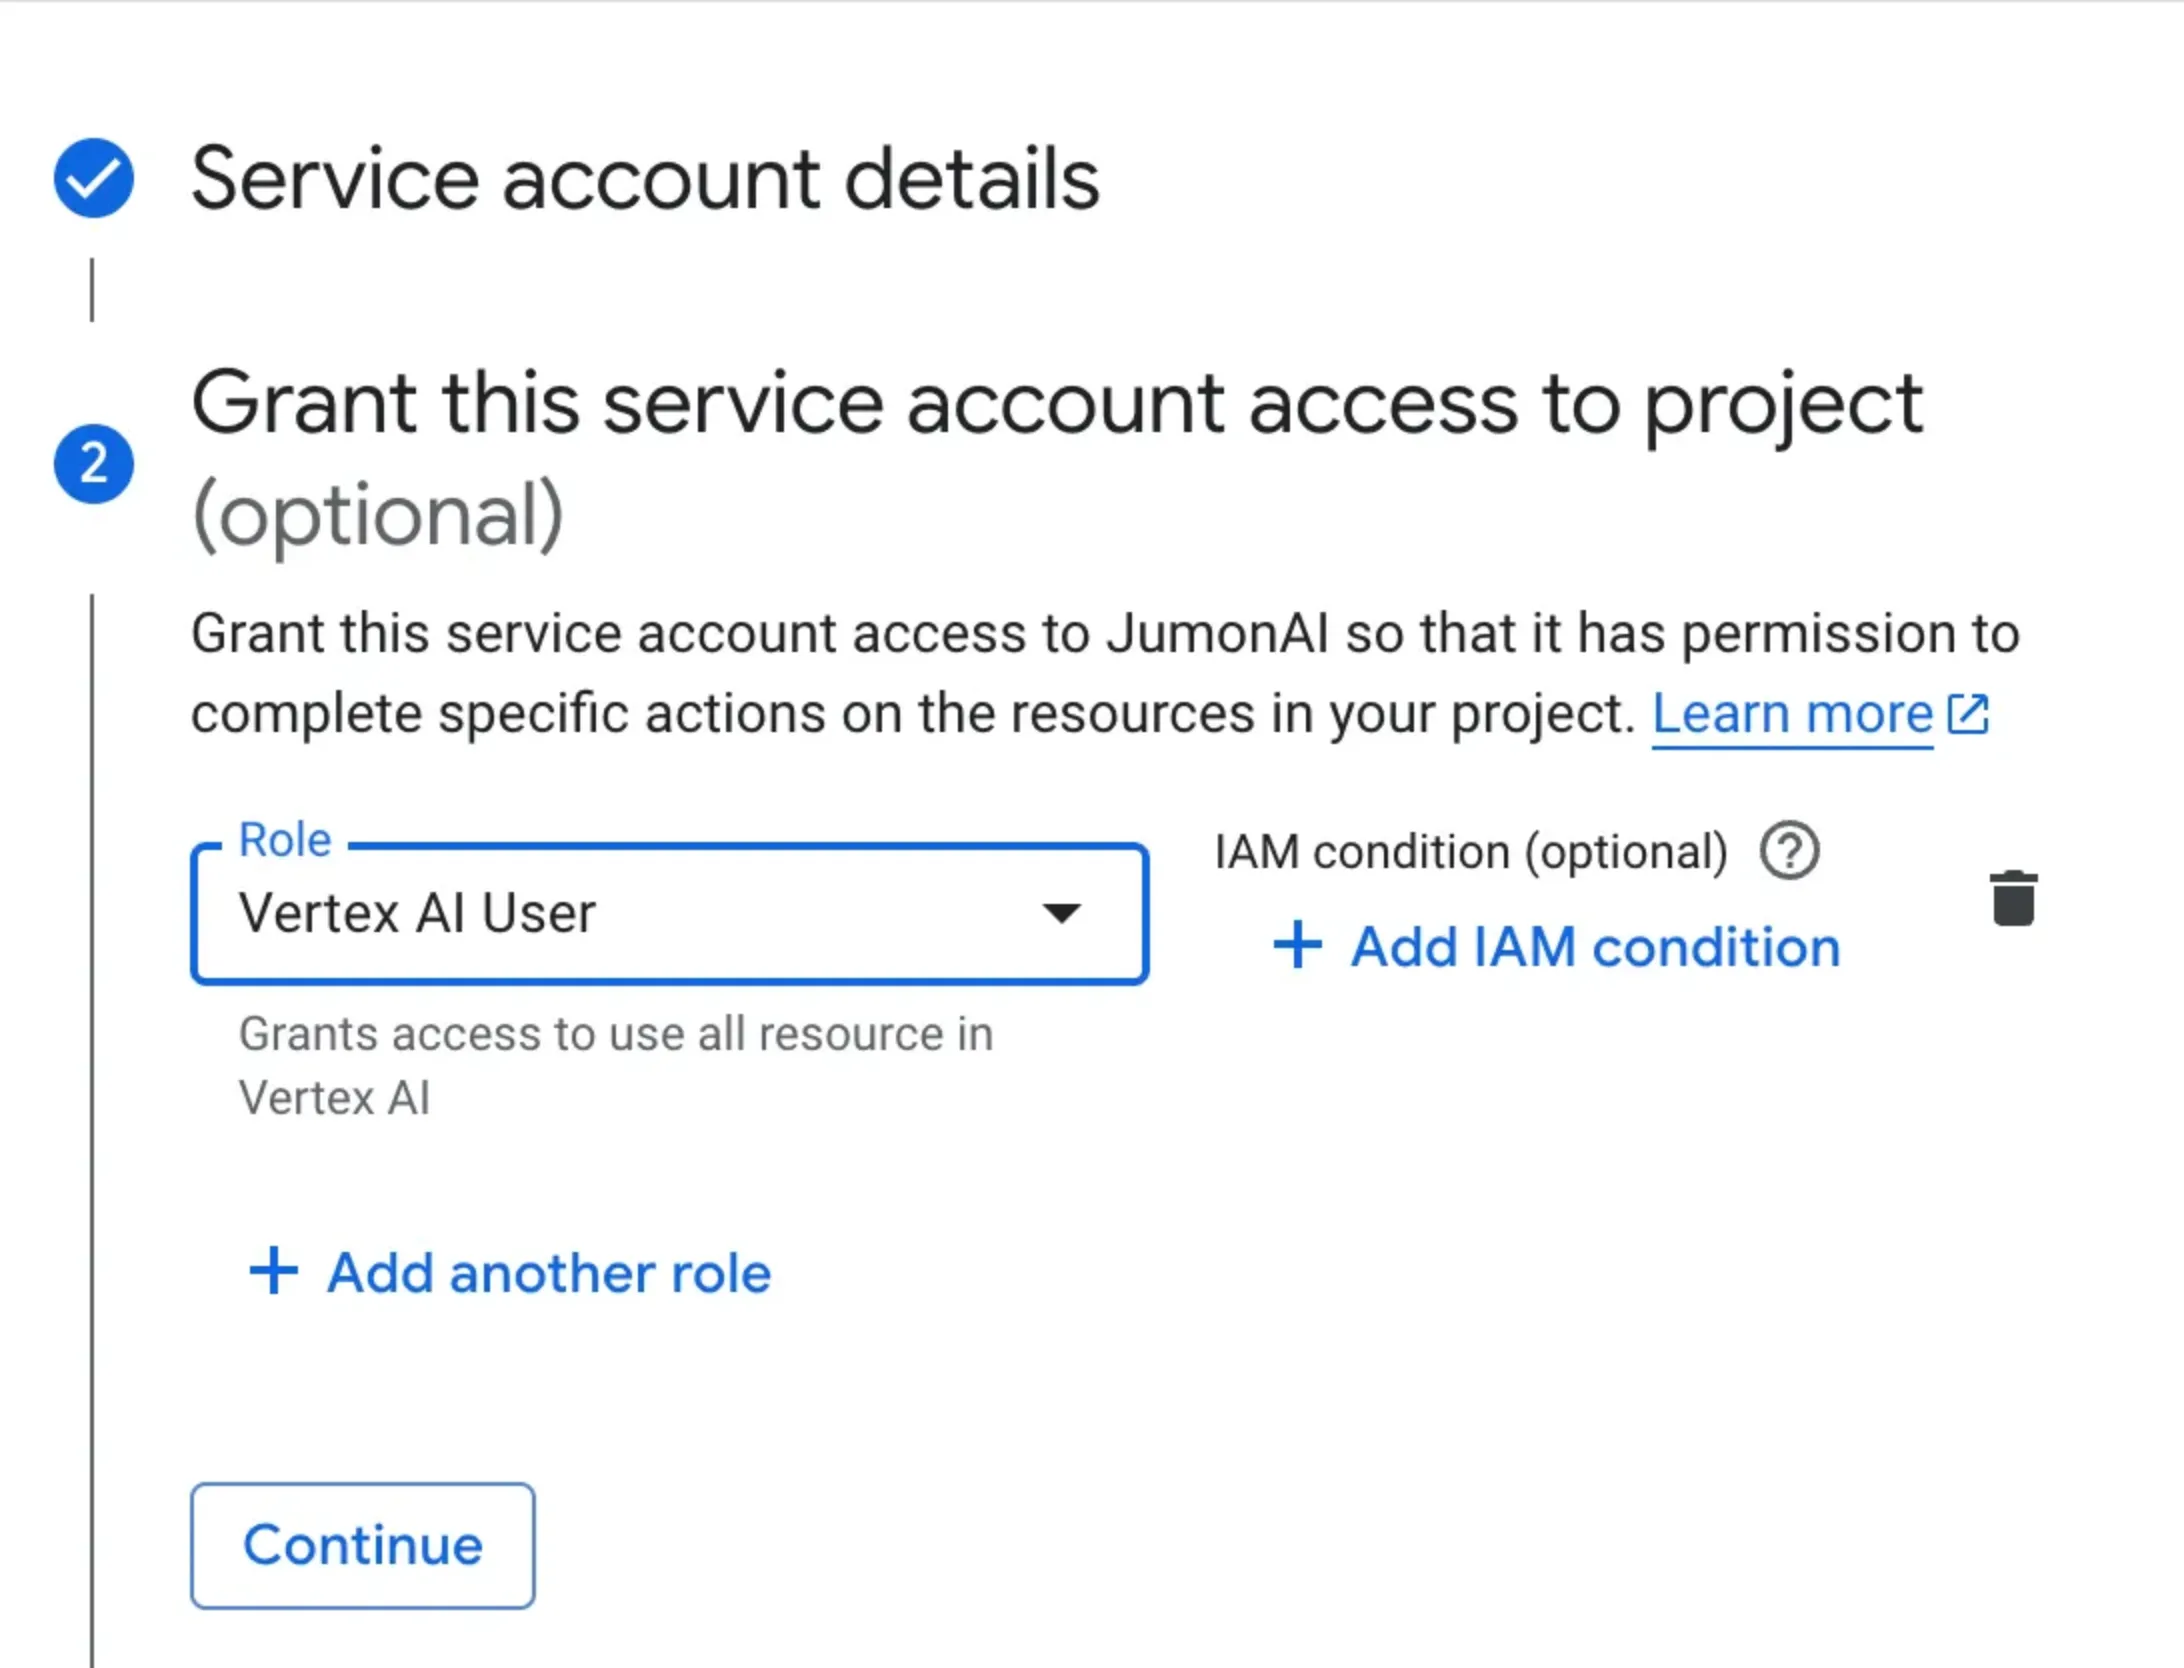
Next, create a service account in your project, with authorization to run Vertex AI. I gave it the Vertex AI User role. There might be better roles for security.
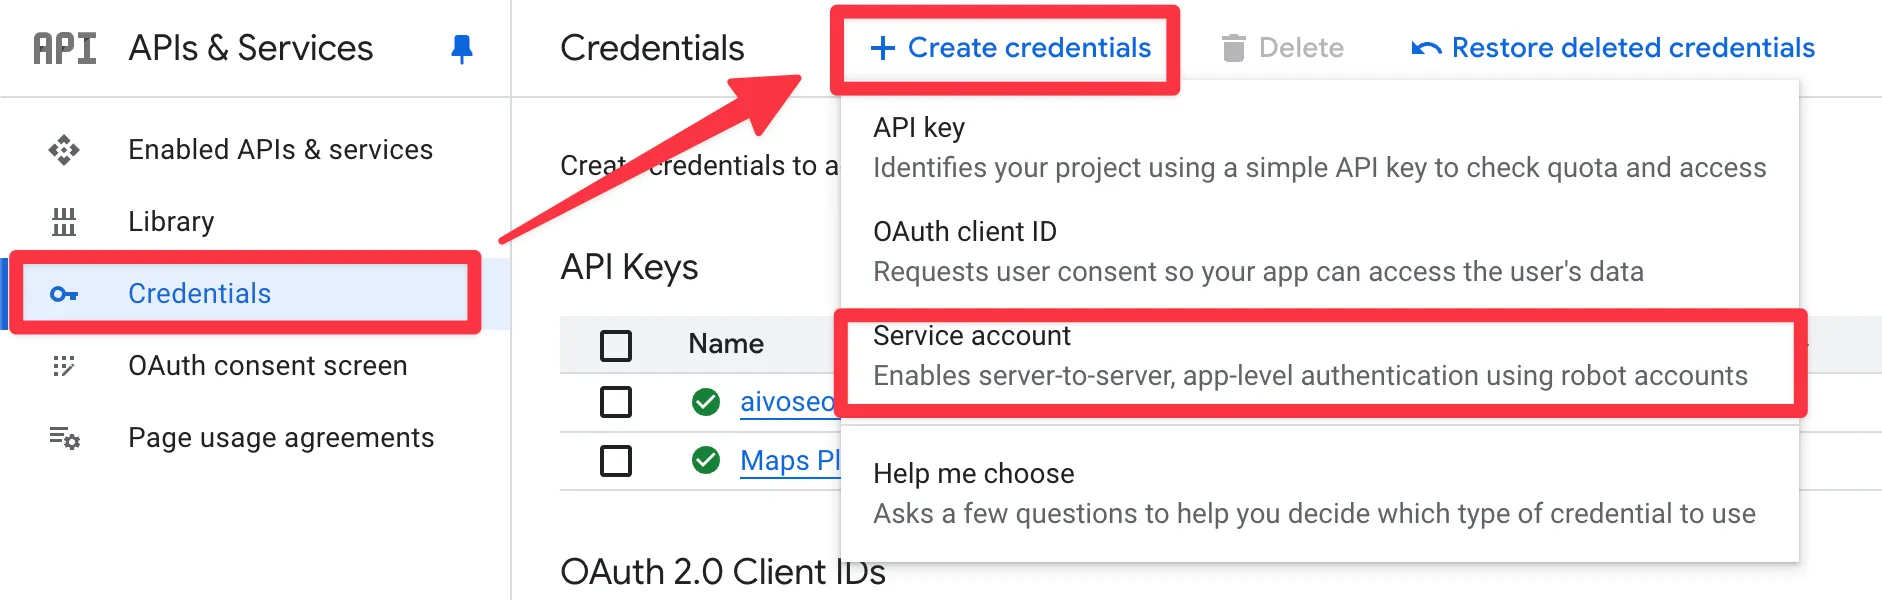
Then select the service account you just created, and go to “Keys” > “Add Key” > “Create new key”. I created it in JSON format.
After you download the key, you can open the file in your text editor. You’ll need to get details from this file and save it as variables and secrets in your .dev.vars and Cloudflare Secrets.
# .dev.vars for development and Cloudflare Secret for any secrets for production
GOOGLE_VERTEX_PROJECT= <<your-project-name>>
GOOGLE_VERTEX_LOCATION= <<your-location>>
GOOGLE_CLIENT_EMAIL= <<your-client-email>>
GOOGLE_PRIVATE_KEY= <<your-private-key>>
GOOGLE_PRIVATE_KEY_ID= <<your-private-key-id>>When saving to Cloudflare Secret, the private_key will not save properly just by pasting. You will have to reformat it by replacing newlines and other characters.
const valueToSaveToCloudflareSecret = privateKey.replace(
/-----BEGIN PRIVATE KEY-----|-----END PRIVATE KEY-----|\r|\n|\\n/g,
'',
)Just open a Node REPL or something to get the above value.
Then paste it into Cloudflare Secret with the CLI in your Terminal:
npx wrangler secret put GOOGLE_PRIVATE_KEY and paste.
If you get an error like the one below, it means your private key string needs to be reformatted.
{
"error": "Error generating questions atob() called with invalid base64-encoded data. (Only whitespace, '+', '/', alphanumeric ASCII, and up to two terminal '=' signs when the input data length is divisible by 4 are allowed.), [object Object]",
"details": "atob() called with invalid base64-encoded data. (Only whitespace, '+', '/', alphanumeric ASCII, and up to two terminal '=' signs when the input data length is divisible by 4 are allowed.)",
"additionalInfo": {
"name": "InvalidCharacterError"
}
}I wasted so much time on this, so hope you don’t have to…
Setting up Cloudflare
Create a new AI Gateway in Cloudflare
Let’s create a new AI Gateway in Cloudflare. Go to your Cloudflare Dashboard and under “AI” > “AI Gateway” click “Create Gateway”.
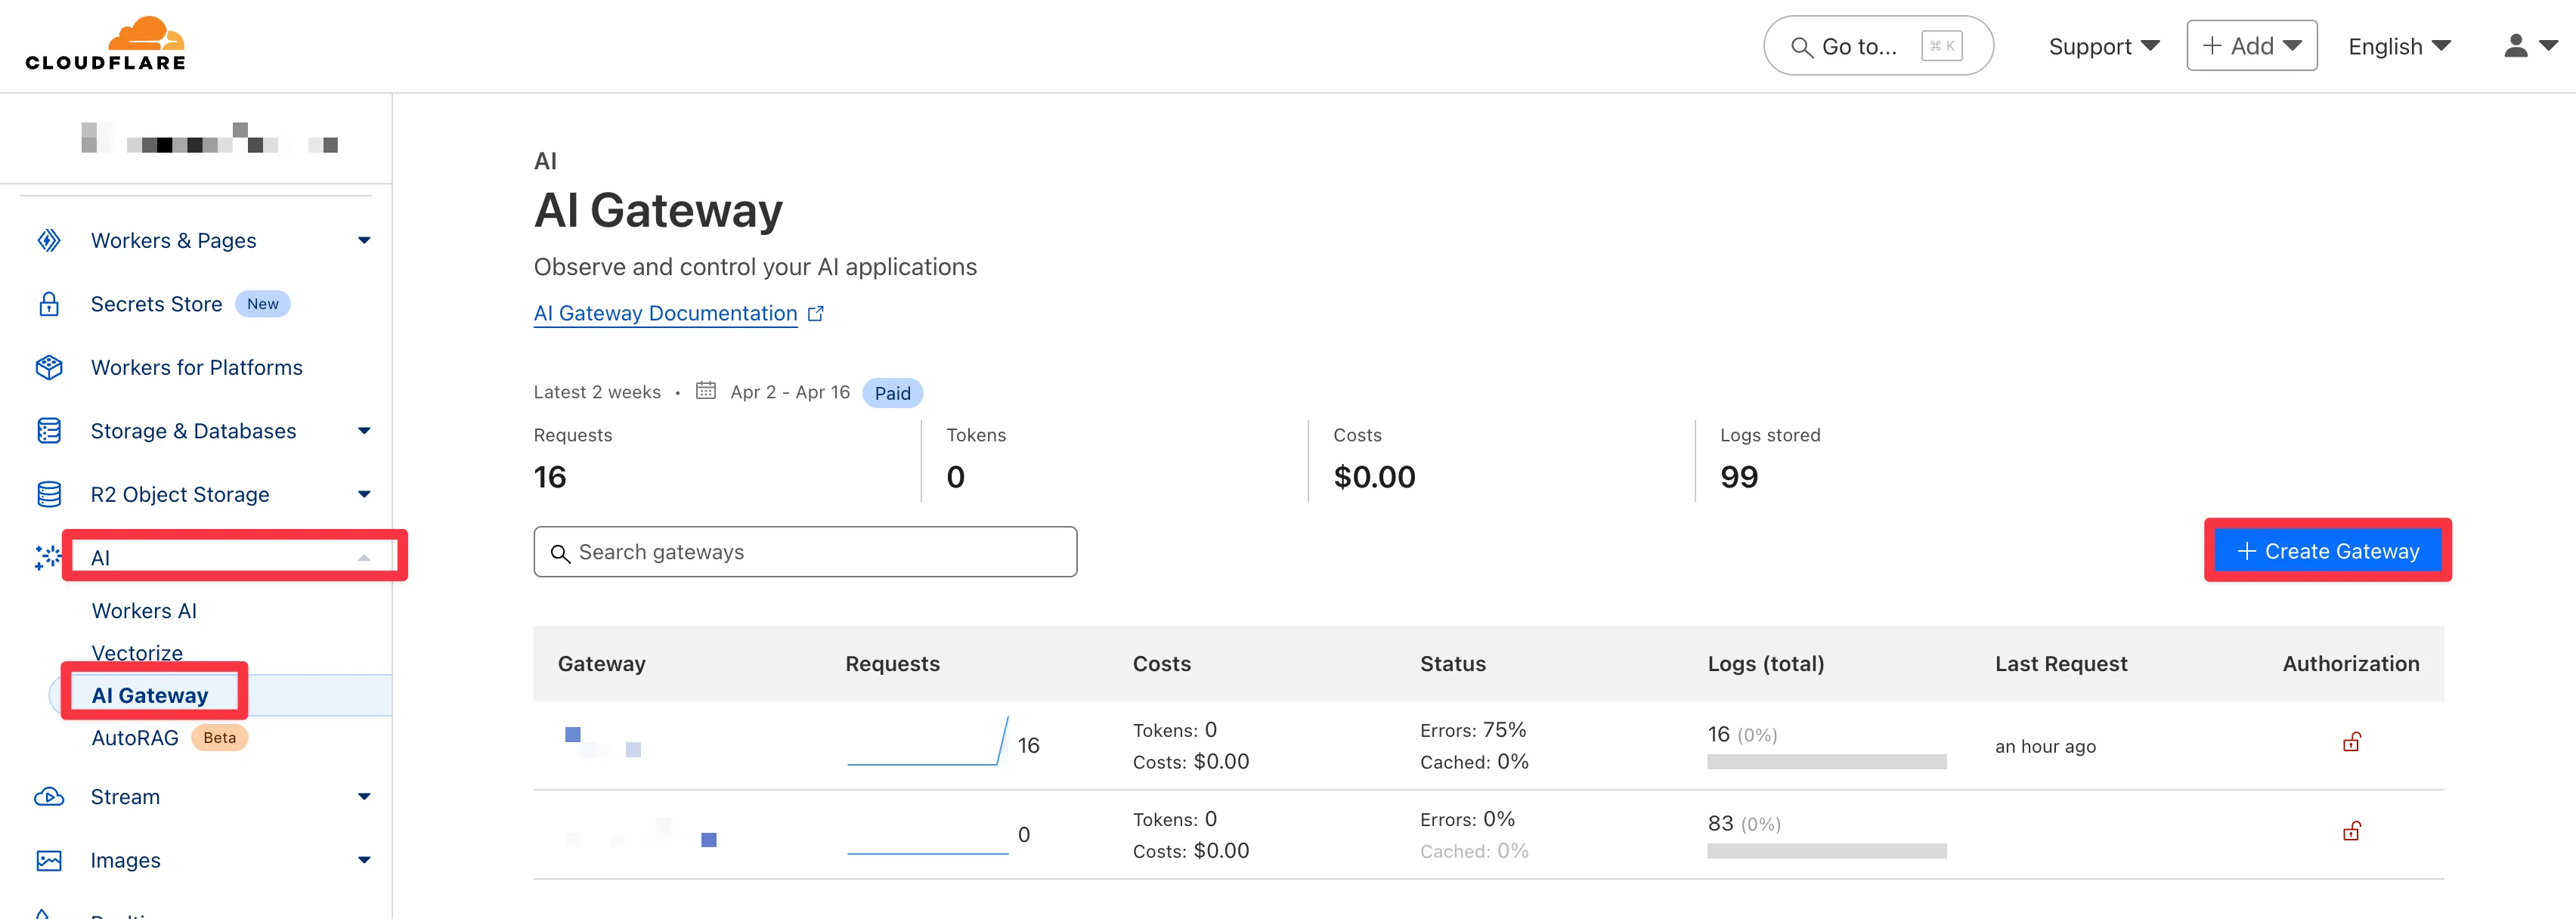 After you create it, you will see a “API” button. You can get the first half of your AI Gateway endpoint from there, which includes your Cloudflare ID and the AI Gateway name.
It looks something like this:
After you create it, you will see a “API” button. You can get the first half of your AI Gateway endpoint from there, which includes your Cloudflare ID and the AI Gateway name.
It looks something like this:
https://gateway.ai.cloudflare.com/v1/${CLOUDFLARE_ACCOUNT_ID}/${CLOUDFLARE_AI_GATEWAY_ID}/google-vertex-aiApplication Logic, Variables and Secrets
Using AI-SDK in your Cloudflare Project with AI Gateway
Now that you have everything all set, let’s go to your project where you’ll be using the AI APIs.
Here, we’ll be using Vercel’s AI-SDK, which is a really well built, easy-to-use library.
Install dependency:
pnpm add @ai-sdk/google-vertexThen where you make your API call, use the edge version since we are deploying on Cloudflare Workers.
import { createVertex } from '@ai-sdk/google-vertex/edge'The baseURL setting was a little confusing from the current AI-SDK docs, but the following worked:
const { env } = getCloudflareContext()
const {
CLOUDFLARE_ACCOUNT_ID,
CLOUDFLARE_AI_GATEWAY_ID,
GOOGLE_VERTEX_PROJECT,
GOOGLE_VERTEX_LOCATION,
GOOGLE_CLIENT_EMAIL,
GOOGLE_PRIVATE_KEY,
GOOGLE_PRIVATE_KEY_ID,
} = env
const baseURL = `https://gateway.ai.cloudflare.com/v1/${CLOUDFLARE_ACCOUNT_ID}/${CLOUDFLARE_AI_GATEWAY_ID}/google-vertex-ai/v1/projects/${GOOGLE_VERTEX_PROJECT}/locations/${GOOGLE_VERTEX_LOCATION}/publishers/google`
const vertex = createVertex({
baseURL,
project: GOOGLE_VERTEX_PROJECT,
location: GOOGLE_VERTEX_LOCATION,
googleCredentials: {
clientEmail: GOOGLE_CLIENT_EMAIL as string,
privateKey: GOOGLE_PRIVATE_KEY as string,
privateKeyId: GOOGLE_PRIVATE_KEY_ID as string,
},
})Notice how the baseURL string does not end with .../google-vertex-ai and should also include info about your Google Cloud project and location.
I generated structured output via the generateObject method from AI-SDK, with something like below, but you get the idea:
const generatedQuestionsResponse = await generateObject({
model: vertex('gemini-2.0-flash-001'),
messages: [
{ role: 'system', content: systemPrompt },
{ role: 'user', content: JSON.stringify(dataIWantProcessed) },
],
schema: suggestQuestionsSchema,
maxRetries: 1,
})Everything should be working well on your local machine by now.
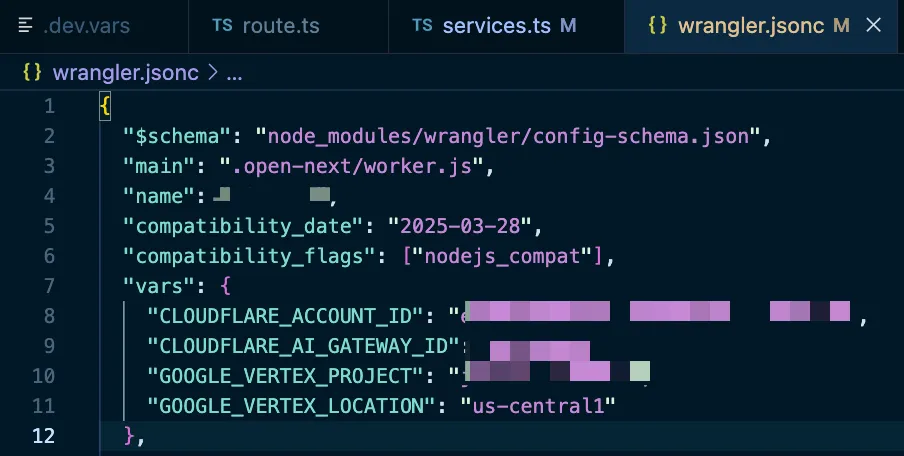
Adding Secrets to Cloudflare
Before you deploy, you’ll want to make sure you added all of your secrets to Cloudflare.
npx wrangler secret put GOOGLE_PRIVATE_KEY # etc...Adding Variables to Cloudflare
For any variables, you can add them to your wrangler.jsonc or wrangler.toml file, like so:
Deploying to Cloudflare
Now that you have everything all set, you can deploy your project to Cloudflare.
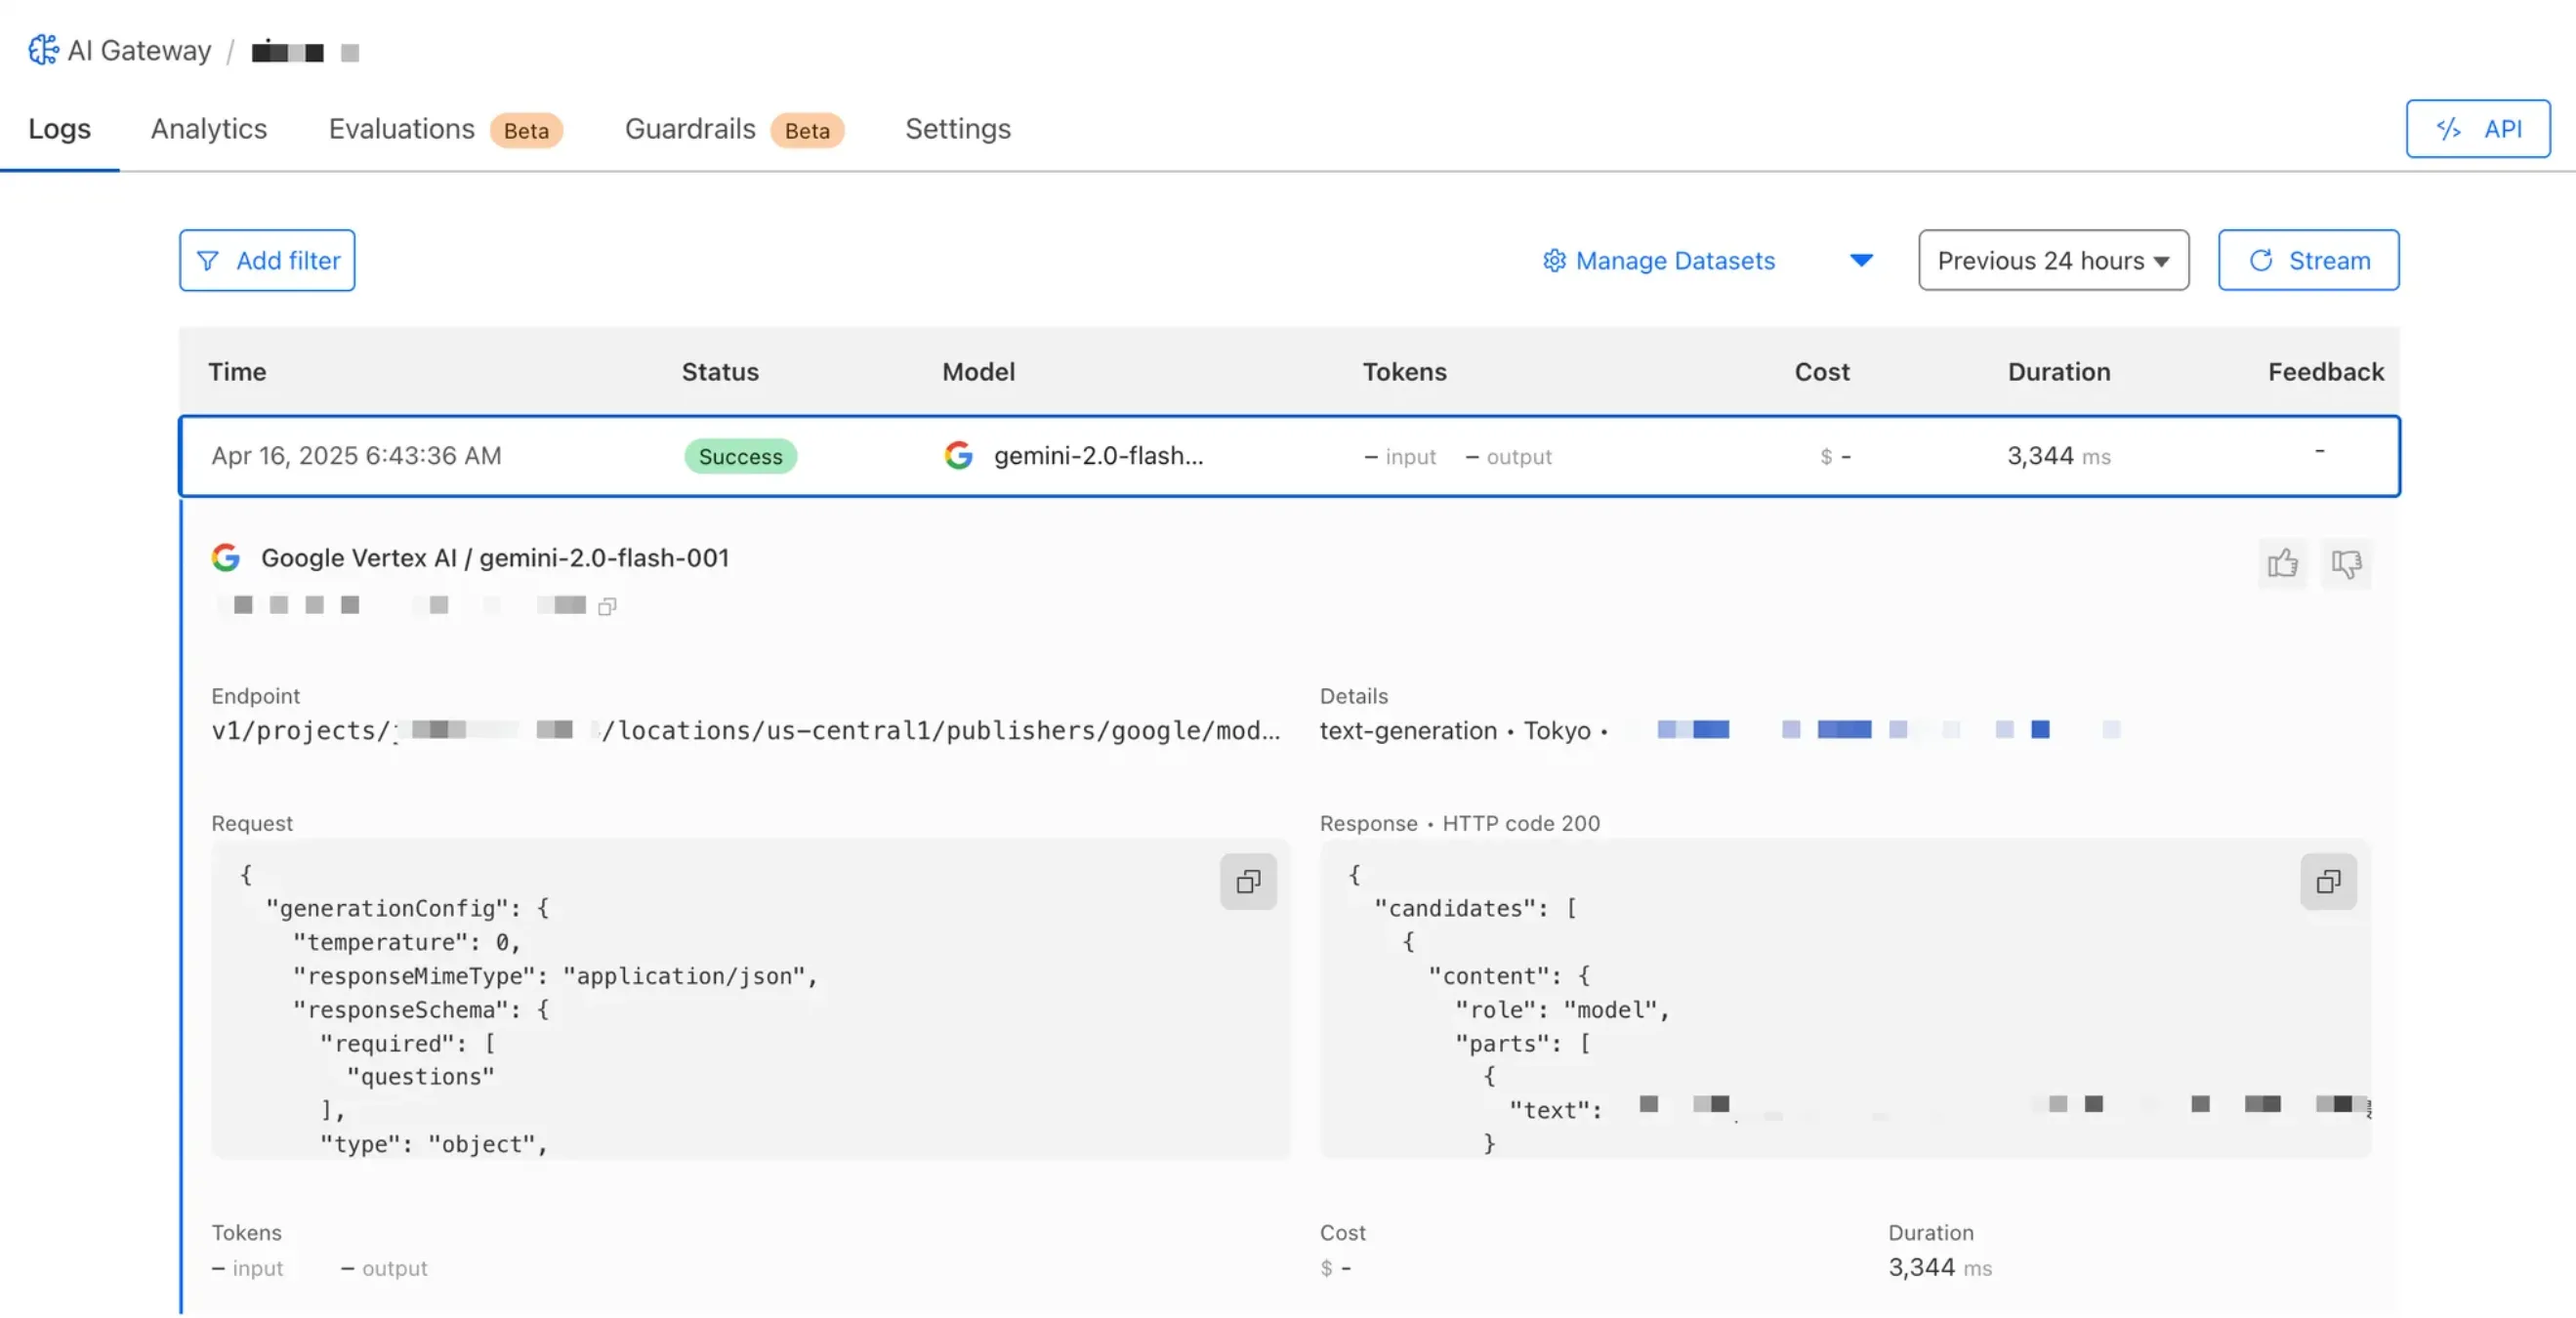
pnpm run deploy # or whatever your deploy command isAnd if everything went well, you should be able to see your new AI Gateway endpoint in action.
Conclusion
So, hope that helps someone who get’s stuck on any of the steps above. I had to stitch a few things here and there to arrive at the current setup, especially where saving the private key to Cloudflare Secret won’t work because of newlines and other characters that caused a cryptic error.